Blog
DIY Lash Extensions: A Complete Guide
The salon
Schedule
| Lundi | 8:00 – 21:00 |
| Mardi | 8:00 – 21:00 |
| Mercredi | 8:00 – 21:00 |
| Jeudi | 8:00 – 21:00 |
| Vendredi | 8:00 – 21:00 |
| Samedi | 8:00 – 21:00 |
| Dimanche | 8:00 – 21:00 |
Schedule
| Lundi | 8:00 – 21:00 |
| Mardi | 8:00 – 21:00 |
| Mercredi | 8:00 – 21:00 |
| Jeudi | 8:00 – 21:00 |
| Vendredi | 8:00 – 21:00 |
| Samedi | 8:00 – 21:00 |
| Dimanche | 8:00 – 21:00 |
Voir calendrier
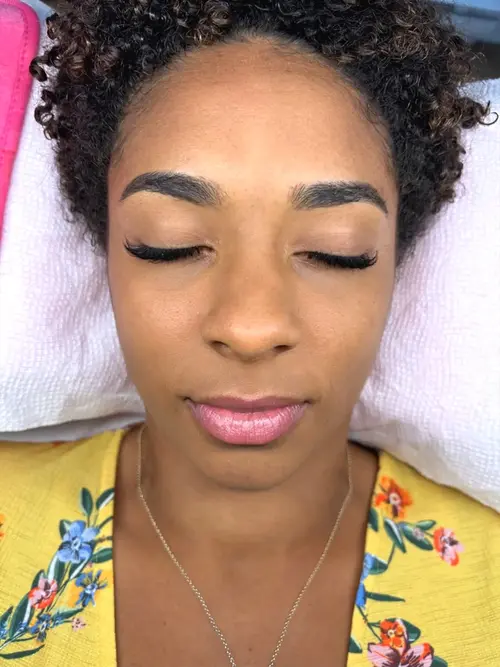
DIY lash extensions have gained popularity as a cost-effective and convenient way to achieve fuller, longer lashes at home. With the right tools and techniques, you can enhance your natural lashes without the need for a salon visit. In this guide, we’ll walk you through everything you need to know about DIY lash extensions, from the tools required to application tips, aftercare, and more.
What Are DIY Lash Extensions?
DIY lash extensions are individual lash fibers or clusters that you can apply at home using a specialized adhesive. Unlike traditional false lashes, which sit on top of the lash line and are often used for single-day wear, DIY lash extensions are applied directly to your natural lashes, offering a more seamless, long-lasting look.
How They Differ from Professional Lash Extensions:
- Professional Lash Extensions: Applied by a trained technician using individual fibers on each natural lash, lasting 2-4 weeks with proper care.
- DIY Lash Extensions: Applied by yourself at home using clusters or individual fibers, typically lasting up to a week or more, depending on aftercare.
The main advantage of DIY lash extensions is the cost-effectiveness and convenience, allowing you to enhance your lashes without the time or expense of visiting a salon.
Tools You Need for DIY Lash Extensions
To achieve a professional-looking finish at home, you'll need the right tools. Here’s a list of essentials for applying DIY lash extensions:
-
Lash Adhesive
Choose a high-quality, oil-free lash adhesive that is safe for sensitive eyes. For longer-lasting results, opt for an adhesive designed specifically for lash extensions rather than strip lashes.
-
Tweezers or Lash Applicators
Use precision tweezers or a lash applicator tool to pick up and apply the lash clusters or individual fibers. These tools help you place the extensions accurately along the lash line.
-
Individual Lash Clusters or Fibers
DIY extensions often come in small clusters or individual fibers that you can apply one by one. Cluster lashes are easier for beginners, while individual lashes offer more customization.
-
Spoolie Brush
A clean spoolie brush (like a mascara wand) is essential for brushing through your lashes before and after application. This helps align the extensions and blend them with your natural lashes.
-
Lash-Safe Cleanser
After application, you’ll need a gentle, oil-free cleanser to keep your lashes clean without weakening the adhesive bond.
Step-by-Step Guide to Applying DIY Lash Extensions
Applying DIY lash extensions requires patience and precision, but with practice, it becomes easier. Follow this step-by-step guide to achieve flawless results.
-
Step 1: Clean Your Eye Area
Before applying extensions, ensure your lashes and eyelids are clean and free of oils or makeup. Use an oil-free makeup remover or lash cleanser to clean the area thoroughly.
-
Step 2: Select Your Lash Length and Curl
Choose the right length and curl based on your desired look. For a natural appearance, select lashes that are only slightly longer than your natural ones. For a more dramatic effect, opt for longer or more curled lashes (like C curl or D curl).
-
Step 3: Apply the Lash Adhesive
Apply a small amount of adhesive to the base of the lash cluster or individual fiber. Wait for the glue to become tacky (about 30 seconds) before placing it on your natural lash for better adhesion.
-
Step 4: Apply the Lash Extensions
Using tweezers or a lash applicator, carefully place the lash extension close to your natural lash line, avoiding direct contact with your skin. Start from the outer corner of your eye and work your way in, applying lashes in small sections for better control.
-
Step 5: Adjust and Align the Lashes
Once the lash extensions are applied, gently brush through them with a spoolie to blend and align the lashes. This helps distribute the extensions evenly and gives a more natural look.
Tips for Beginners:
- Work in small sections to avoid becoming overwhelmed.
- If you make a mistake, remove the extension carefully with tweezers before the adhesive fully dries.
- Practice patience; applying DIY lash extensions gets easier with experience.
DIY lash extensions are individual lash fibers or clusters that you can apply at home using a specialized adhesive
How to Maintain Your DIY Lash Extensions
Proper maintenance is key to ensuring your DIY lash extensions last longer and stay looking fresh. Here are some essential aftercare tips:
-
Avoid Oil-Based Products
Keep oil-based makeup removers, cleansers, and moisturizers away from your eyes, as oils can weaken the adhesive. Stick to oil-free, lash-safe products.
-
Clean Your Lashes Regularly
Gently clean your lashes with a lash-safe cleanser every day to remove dirt, oils, and makeup residue. Be careful not to rub or tug at your extensions while cleaning.
-
Brush Lashes Daily
Use a clean spoolie brush to gently comb through your lashes every day. This prevents tangling, maintains the shape of the extensions, and keeps them looking fresh.
-
Avoid Water and Steam for the First 24 Hours
After applying your extensions, avoid excessive exposure to water, steam, or sweat for the first 24 hours. This allows the adhesive to fully set and ensures longer-lasting lashes.
How to Safely Remove DIY Lash Extensions
Removing your DIY lash extensions properly is crucial to avoid damaging your natural lashes. Follow these steps for safe removal:
-
Step 1: Use a Lash Remover
Purchase a lash remover designed for breaking down lash adhesive. Apply it to the base of the lash extensions and wait a few minutes for the adhesive to dissolve.
-
Step 2: Gently Remove the Extensions
Once the adhesive is softened, gently remove the extensions using tweezers or your fingers. Avoid pulling or tugging on the lashes to prevent damage to your natural lashes.
-
Step 3: Clean Your Natural Lashes
After removing the extensions, thoroughly clean your natural lashes with a gentle, oil-based makeup remover to remove any remaining adhesive or residue.
Pros and Cons of DIY Lash Extensions
Before deciding if DIY lash extensions are right for you, consider the pros and cons to help make an informed decision.
Pros of DIY Lash Extensions
- Cost-Effective: DIY lash extensions are much more affordable than professional salon applications.
- Convenience: You can apply them at home, saving time and money on salon visits.
- Customization: You have full control over the length, curl, and placement, allowing you to create a look tailored to your preferences.
Cons of DIY Lash Extensions
- Learning Curve: It takes practice to master the application technique. Beginners may find it challenging to achieve professional-looking results at first.
- Potential for Allergic Reactions: Some individuals may experience sensitivity to the adhesive, especially if it’s not specifically formulated for sensitive eyes.
- Regular Maintenance: Like professional lash extensions, DIY versions require regular maintenance, including cleaning, brushing, and touch-ups to maintain their appearance.
Conclusion
DIY lash extensions are an affordable and convenient way to enhance your lashes at home. With the right tools, techniques, and aftercare, you can achieve a long-lasting, salon-worthy look. While there is a learning curve, practice and patience will help you master the art of applying lash extensions yourself.
Don't forget to follow @meyinabeauty on Instagram for tips, inspiration and exclusive offers and to visit our Google profile to keep up to date with our latest news! Also, check out our eyelash extension service page in Montreal to achieve a more intense look!
Keywords: DIY lash extensions, how to apply lash extensions at home, lash extension maintenance, lash extension removal, lash extension tools, DIY beauty tips.